How To Fix ERROR_NOT_FOUND 0x80070490 During Windows 7 SP1 Installation
Updated: May 17th, 2012
 Well, this one took ages. And whenever something takes me ages, rather than write it down in my personal notes, I prefer to put it out online for everyone with the same problem to easily find and benefit from.
The problem I'm talking about today is trying to upgrade your Windows 7 installation to SP1 by applying Microsoft's update KB976932, called "Windows 7 Service Pack 1 for x64-based Systems" and getting nothing but a failure every time. The same problem may affect 32-bit systems as well, and I'm not sure what the update number for that would be, but the solution should work for either one.
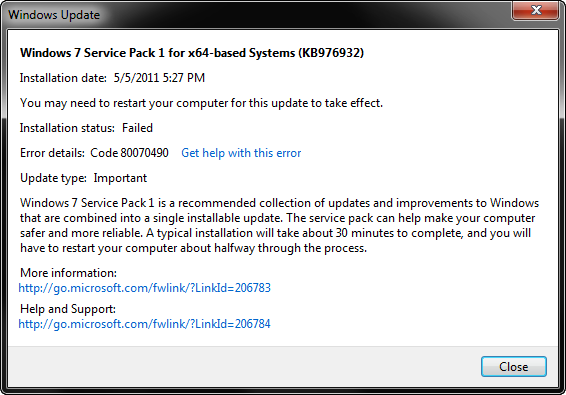
The update starts just fine, chugs along for 10 minutes or so, then reboots the system and starts performing more operations, when suddenly one of them fails about 10% down the road, reboots, and reverts the whole process. You end up with this message (code 80070490) and a failure for which there are a lot of useless "solutions" on the web that just don't work.
Except for one. I can't take credit for it – all I did was spend a month weeding through the crap, retrying, and getting nowhere, until a genius by the name Ben-IS came up with exactly the right diagnosis and provided exactly the right solution. This solution, in my own interpretation, is below.
Step 1
We are going to use a utility called SFC (System File Checker or Windows Resource Checker), which is part of the Windows installation. It will help diagnose the problem.
Open up a command prompt (cmd) as administrator and run
sfc /scannow
This will run for a while and produce a file called CBS.log which you can find in %WINDIR%\Logs\CBS (usually C:\Windows\Logs\CBS). See this KB929833 for more info on SFC and CBS (Component Based Servicing).
sfc /scannow
Beginning system scan. This process will take some time.
Beginning verification phase of system scan.
Verification 100% complete.Windows Resource Protection did not find any integrity violations.
Even though there are no integrity violations, we should have enough info in the log to diagnose the problem.
Step 2
Unfortunately, Windows overwrote my CBS.log, so I'll go by the one Ben-IS provided.
Open up CBS.log and look for something like Failed uninstalling driver updates or 0x80070490 – ERROR_NOT_FOUND.
If you have this line, which you should if you're reading this post, you should also see lines similar to these a few lines above:
2011-04-14 12:02:33, Info CBS Doqe: q-uninstall: Inf: usbvideo.inf, Ranking: 2, Device-Install: 0, Key: 598, Identity: usbvideo.inf, Culture=neutral, Type=driverUpdate, Version=6.1.7600.16543, PublicKeyToken=31bf3856ad364e35, ProcessorArchitecture=amd64, versionScope=NonSxS
2011-04-14 12:02:33, Info CBS Doqe: q-uninstall: Inf: sffdisk.inf, Ranking: 2, Device-Install: 0, Key: 599, Identity: sffdisk.inf, Culture=neutral, Type=driverUpdate, Version=6.1.7600.16438, PublicKeyToken=31bf3856ad364e35, ProcessorArchitecture=amd64, versionScope=NonSxS
2011-04-14 12:02:33, Info CBS Doqe: q-uninstall: Inf: sdbus.inf, Ranking: 2, Device-Install: 0, Key: 600, Identity: sdbus.inf, Culture=neutral, Type=driverUpdate, Version=6.1.7600.16438, PublicKeyToken=31bf3856ad364e35, ProcessorArchitecture=amd64, versionScope=NonSxS
One of these .inf files is the culprit, and we're going to find out which one in the next step.
Step 3
Now open up a different log file located at %WINDIR%\inf\setupapi.dev.log (normally c:\Windows\inf\setupapi.dev.log).
Look for a line that contains Failed to find driver update or FAILURE(0x00000490).
Note the exact path to the .inf file that failed. In my case, it was:
sto: Failed to find driver update 'C:\Windows\WinSxS\amd64_usbvideo.inf_31bf3856ad364e35_6.1.7600.16543_none_8a1a2513d42628c3\usbvideo.inf' in Driver Store. Error = 0x00000490
Step 4
This is the key to the whole operation. Open up the command prompt again (cmd) as administrator and run
pnputil -a INSERT_FILE_NAME_FROM_STEP_3
For example, I ran
pnputil -a C:\Windows\WinSxS\amd64_usbvideo.inf_31bf3856ad364e35_6.1.7600.16543_none_8a1a2513d42628c3\usbvideo.inf
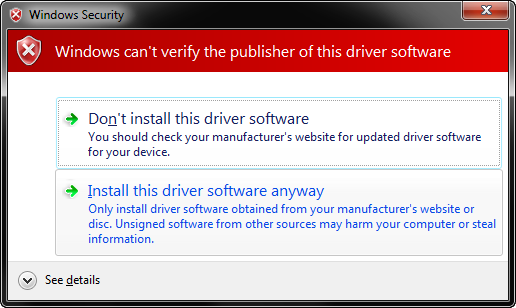
You should see the following dialog:
Choose Install this driver software anyway.
The end result should be something like this:
pnputil -a C:\Windows\WinSxS\amd64_usbvideo.inf_31bf3856ad364e35_6.1.7600.16543_none_8a1a2513d42628c3\usbvideo.inf
Microsoft PnP UtilityProcessing inf : usbvideo.inf
Driver package added successfully.
Published name : oem69.infTotal attempted: 1
Number successfully imported: 1
Repeat this step for any failures found in step 3.
Step 5
Apply the SP1 Windows Update again – it should now install successfully.
And voila – enjoy your SP1!
Microsoft has failed to fix this incredibly cryptic problem, leaving it up to the users to figure out why their SP1 updates are not installing. Thanks to people like Ben-IS, solutions no longer involve head-banging, postal rage, and f7u12.
In the meantime, if you found this article useful, feel free to buy me a cup of coffee below.


